This is the first post on AnimHuT for Designing and Photoshop. We will be sharing some cool Photoshop tips and tricks in coming days for bloggers and designers.
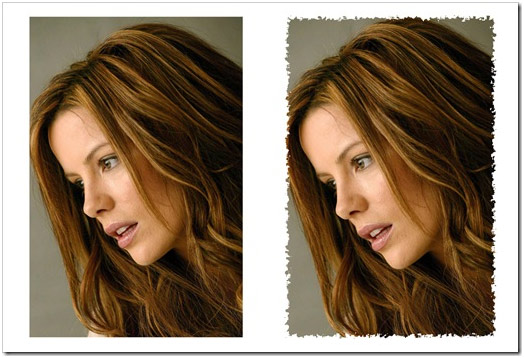
Idea here is educate users about basics of photo editing, so that they can quickly enhance their images in a post which will make their post more appealing. In this post I will be telling you about photo border styling, See sample image below.
We can see many of Photo Border styles. Now we see another example of Photo Border style in Photoshop with
filter effect. we see many of filters in Photoshop. Today we create Photo Border with using Spatter Filter.
There are many other filter to use but i suggest you Spatter Filter for this effect. Its relay amazing to see.
You can create interesting and unique Photo Border with using this filter. So here we go to create our unique Photo Border.
1. Take New Image File
First of all open your Photoshop select new file. Take new image as you want for this tutorial.
I take 400px x 600px file size for this one. you can take any image as you like.
Now I take this one. Give the name of image layer as like image01. Now you can see your file like this.
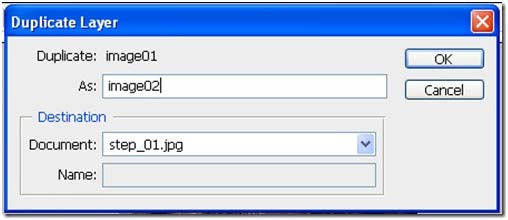
2.Duplicate the Image Layer
Now create duplicate layer of the Image01 layer and give the name like Image02.
You can right click on image layer or press Ctrl+J for duplicate the layer
Ok! now we have 2 layers. First one is imae01 and image02. Now take new layer between image01 layer and image02 layer.
This layer should blank or fill any color in it.
3.Make the Selection of Layer
First of all hide the layer of image01. Than go on layer of image02 and make selection on the images layer.
You can use shortcut also press ctrl and click on image02 layer. OK now go to select > modify > contract
you can see this image. I take 15 pixels for selection. You take any value for this as you required now i take 15px, click OK.
After clicking ok.You can get this image.
4.Apply Layer to Layer Mask
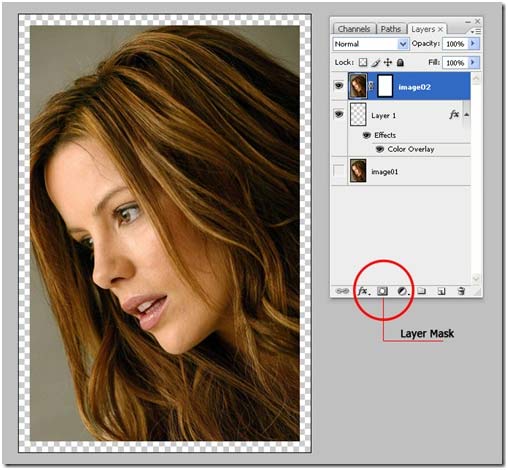
Go to layer palette select the image02 layer and click on layer mask.
This is very important stage for creating border effect. Now be clear we just create a layer mask not a layer itself.
So click the layer mask. When you finish it. Now we are going for our main goal of this tutorial.
5. Apply Spatter Filter to Image
Select the layer of image02 go to filter > Brush Strokes > Spatter just click on it and you can see this palette
take the value of spray radius and smoothness. I’m going to enter a value for spray radius – 10 and its smoothness -5
you can try any other values if want. Still we take this.
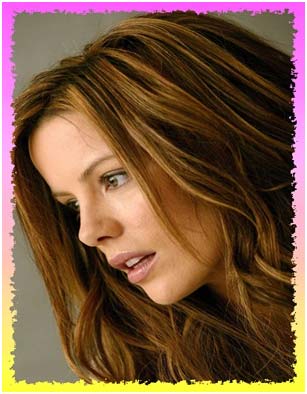
OK here we get our image with very interesting and unique image border effect.
The process might look little lengthy but once you start using it, it will hardly take 2-3 minutes to do it. I will love to hear your reaction about this effect and you can also request for any particulate Photoshop tutorial here via comment.


nice and useful tip
.-= Nikola Lazarevic´s latest blog ..Game, Set and Match: Roland Garros Posters from 1980 to 2010 =-.
Thanks Nikola that you found this article is useful.
Thanks for your comment..
.-= Umesh Katkar´s latest blog ..15 Beautiful and Free 3 Column WordPress Themes =-.
nice quick-tip brother 😀 , can you add gravatar for your email. that will be love-able to know who you are 😀
Thanks Ganesh..yup will add gravatar very shortly.
.-= Umesh Katkar´s latest blog ..15 Beautiful and Free 3 Column WordPress Themes =-.
very useful tip
Nice design buddy.. Keep it up
Thanks for your comment..:-)
.-= Umesh Katkar´s latest blog ..15 Beautiful and Free 3 Column WordPress Themes =-.
Thanks buddy,
Will try to provide some more article related to photoshop designing.
Thanks for your comment..:-)
.-= Umesh Katkar´s latest blog ..15 Beautiful and Free 3 Column WordPress Themes =-.
nice n simple tutorial
Thanks to all who find this article is useful.
hey this stuff is really nice… i liked it a lot and appriciate your efforts
Thanks Ashish.
Great tip…its easy and quick. Thanks for sharing 🙂
.-= Whiztechy´s latest blog ..5 Things to Consider Before Buying any Website =-.
Hi Umesh,
Welcome to Animhut. Nice tutorial. Expect more from you.
Great quick tip, mate. Keep it up!
.-= Richie´s latest blog ..Time for a short break : Examinations 🙂 =-.
very Nice and useful tip
.-= Rocky´s latest blog ..50 Creative and Inspirational Liquor Advertisements =-.
Quick & easy. Thanks Animhut.
.-= adone´s latest blog ..The Piecemaker. 3d Slideshow dla Joomli =-.
Nice article
gud 1
Thanks…!
He Maharaj,
U R shining all over. Keep it up.
Hi,
Thats Wonderful
Thanks for Sharing
Regards.
.-= Aery´s latest blog ..2 Speedy Ways to Search Google with Keyboard Shortcuts =-.
Thanks for your comment..!
I don’t understand why did you had to duplicate the image layer
It’s not imp. It just like as an backup of original image. If in case you need the original image you can take from this layer. And I also suggest whenever you work on any image(Photo) keep the backup of original image. It will need to compare after you finish your work on the image………anyway thanks for the comment.
Umesh very useful tip but this could be done with shortcut also
but good tut
Thanks….!
Nice article buddy. Please provide more articles for fresher to design world.
Defiantly! it’s my pleasure ……….. Thanks for the comment.
Nice Tutorial
Thanks …!
Can’t get the Modify command to work. It is grayed out no matter what I seem to do. Can you give me help?