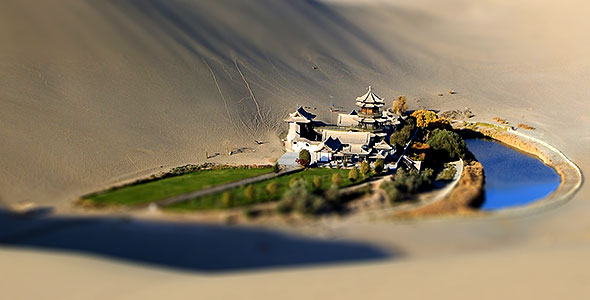
Hello Friends, Today we are going to Create or achieve the Famous Tilt-Shift method using Photoshop CS6 tutorials. Graphic and web Design blog as already created 3 Photoshop CS6 tutorials for readers like Designers and photographers. This time we added a Video Tutorials as a “Quick Tip” for you and we need your feedback on this video.
For New Readers, first know what is “Tilt-Shift Photography”
“Tilt-shift photography” refers to the use of camera movements on small- and medium-format cameras, and sometimes specifically refers to the use of tilt for selective focus, often for simulating a miniature scene. Sometimes the term is used when the shallow depth of field is simulated with digital post-processing; the name may derive from the tilt-shift lens normally required when the effect is produced optically.
“Tilt-shift” encompasses two different types of movements: rotation of the lens plane relative to the image plane, called tilt, and movement of the lens parallel to the image plane, called shift. Tilt is used to control the orientation of the plane of focus (PoF), and hence the part of an image that appears sharp; it makes use of the Scheimpflug principle. Shift is used to adjust the position of the subject in the image area without moving the camera back; this is often helpful in avoiding the convergence of parallel lines, as when photographing tall buildings.
Via Source
Tilt-sift method is to create a fake photo impression of small objects or wonderful miniature of the subject we are going to do it. You might be wondering or some may think why he is chewing the old thing which know by many – for your clarification these effects can be achieved in many way and it depends on the users and creativity the a user may go.
As you noticed, This Tilt-Shift Tutorial is based on NEW Adobe PHOTOSHOP CS6 – already 3 tutorials were created and this one is fourth from our side. And we already made this tutorial 3 days before – due to some Technical issue we couldn’t connect with our blog to upload it.
Now it’s time to dig into the Photoshop CS6 new tutorials for creating “Tilt-Shift method”, below we have attached Video Tutorial for Photoshop Quick tips.
Create Tilt-Shift Method using New Blur tool in Photoshop CS6
First download some nice skyscrapers or cityscapes and if you love nature you can download images from SXC.HU other 180+ Resource sites for Royal free site.
We used an Image of “oasis” taken from tumblr upload by the user we couldn’t track them. Apologize for that, even you can take your own Photography of your surroundings.
Step: 2
Now duplicate the background image by DRAGING them to Layer palette ‘NEW ICON’ or [Ctrl+J].
Step: 3
For getting Tilt-shift technique we should Choose FILTER menu from the top. Select “BLUR” sub Menu, which leads to 3 different New Blur tool from the top. Now choose the Tilt….Shift blur option
Set your own value according to your image which you use or see the above video. Drag the centre rounded slider for more or less blur option.
There will be two blur reposition grid at the top and bottom, Adjust them as per your need and click ok.
Yup you got it. Now add some colour saturation by using Levels in the Photoshop tool menu or you can use the overlay effect.
The result:
It’s a quick tip and can be done within less than 2 min 😀
Did you like this “Quick tip” Photoshop CS6 Tutorials. We have lots of other inspiration, Adobe Tutorials and Freebies – just go thorough our blog.


Bravo! I thought it can only be done using my canon camera for this miniature photos. I only have CS5 and I think I should upgrade to CS6 because of watching this tutorial.
Thank you for the comment Jon
Quite new topic for me. But very informative post. Like John I think it’s time to upgrade to CS6. Very nice tutorial.
Thanks for the comment !
Thanks for the post and the video. I am really just a beginner but this features seems AWESOME. Plus, you added really nice background music for the video. Really neat. 🙂
Every pro has started as beginner ! Good Luck and share your works – we might feature your work in our blog.
Looks like original, better to switch from CS5 to Photoshop CS6
I haven’t got my hands on CS6 yet. Surely look into it after viewing this post.